
Key Takeaways
-
The accepted maximum volume of fat removal in a single liposuction procedure is approximately 5 liters. Beyond this amount, there is an elevated risk of severe complications.
-
Your specific anatomy and physiology ultimately govern the answer to how many liters are removed during liposuction.
-
Medical guidelines suggest meeting with experienced plastic surgeons who will evaluate your individual health, anatomy and goals and determine what is the safest option.
-
Good intra-operative fluid management and cautious monitoring are imperative to minimize the likelihood of risks like fluid shifts, embolism, and other complications.
-
Knowing the breakdown of the aspirate (fat versus fluids and tissues) provides us with helpful information in managing your expectations and potentially future procedures like fat transfer.
-
Larger volume fat removal may require staged procedures, placing importance on patient safety and optimal recovery.
Once again, how many liters removed liposuction? Physicians are careful to maintain a safe volume for each individual. They may differ depending on body type, health and local regulations.
Greater quantities may carry increased hazard as well. Thus, medical examinations prior to and following the procedure are essential.
To provide transparency, below are details on safety, recovery, and what to expect for various quantities.
The Liters Limit
How many liters of fat are safe to remove in a single liposuction session is a primary concern for any prospective patient. Five liters (5,000 cc) is the reported maximum in most outpatient clinics. This volume is reserved for certain patients and is termed “large-volume liposuction.” Most people have two to four liters removed.
Surgeons usually suggest smaller doses to reduce danger. Complication rates peak above five liters, so some cases are divided over multiple sittings. Personal health, body composition, and personal goals define safe removal limits.
|
Maximum Volume Removed |
Setting |
Complication Rate |
Risks |
|---|---|---|---|
|
2–4 liters |
Standard outpatient |
1.1% |
Mild fluid shifts, bruising, swelling |
| 5 liters | Large volume/outpatient | 3.7% | Blood loss, fluid imbalance, infection |
| 6 l | special cases/inpatient | Higher | Higher risk, typically needs tracking |
1. The Guideline
Medical groups establish 5 liters as the safe cutoff for fat removal in a single outpatient procedure. This rule isn’t universal; it’s an upper bound, not a goal. Surgeons have to factor in patient health, target areas, and body size.
Board-certified plastic surgeons leverage their expertise and experience to establish safe objectives for each individual. Patients should always discuss with a board-certified professional to determine their limits. Observing these protocols prevents you from risks of severe side effects, like fluid imbalance and infection.
2. Body Mass Index
BMI is one of the primary means by which doctors determine how much fat can be extracted. Low BMI individuals may be candidates safely only for one to two liters of aspirate, whereas a high BMI individual may handle even six liters, which is seldom the case.
Higher BMI carries more risk, so our doctors will sometimes suggest more treatments with lower amounts each time. Maintaining a stable weight preoperatively reduces risk and enhances the ultimate appearance.
3. Treatment Area
It turns out that where you remove the fat from matters. These include areas such as the belly, thighs, and flanks, but each comes with its own safe volume range. The belly tends to be forgiving when it comes to fat extraction, whereas areas with less loose skin, such as arms, call for a lighter touch.
Skin elasticity and fat quantity round the scheme. Each individual’s ambitions and shape determine the choices, rendering a personalized plan essential.
4. Patient Health
Good health pre-op keeps risks low. Chronic issues like heart disease or diabetes might require tighter limits or approval from other doctors. Being active and eating nutrient-rich meals in the weeks leading up to surgery makes your body heal quicker.
Age and fitness contribute to the speed of the bounce back and quality of the result.
5. Surgical Technique
Your body fat percentage determines how much fat can be safely extracted. Excessive body fat might require extra attention, as administering too much at one time can result in fluid shifts and shock.
Surgeons use body composition scans to map their safest approach. To our patients, it’s long term shape that you should be thinking about, not how many liters you took out. This aids in establishing secure, pragmatic targets and results.
Patient Variables
There are some patient variables involved in figuring out how many liters of fat can be removed safely during liposuction. Factors such as body fat, skin elasticity, and medical history all help point to safe surgical choices. By accounting for these variables, we can establish realistic expectations and foster safer outcomes for patients across the globe.
Body Fat Percentage
Body fat percentage is a major determinant in how much fat can be taken. Surgeons use this number to calculate a safe limit for each individual. Bigger patients might not always be able to get more fat removed in one sitting, since removing too much can be dangerous and does not yield the best aesthetic results.
For those with low body fat, surgeons can sometimes undertake a more aggressive fat removal in the name of safety. Great examples are athletic patients, where a small fat reduction may produce dramatic results, versus an obese person, where safety is the priority.
Fat distribution is important. If fat is dispersed in a region, the skin can pull back nicely. If fat is deep or irregular, taking out big chunks can cause dimples or irregular contours. For those with pockets of resistant fat, hitting those zones can sculpt the body even more.
We generally recommend that patients come to a stable, healthy body fat percentage before surgery as this can make the operation safer and produce superior results.
Skin Elasticity
Skin elasticity lays the foundation for how the body will look post-liposuction. Good elasticity implies that the skin can contract to accommodate the new shape, resulting in a smooth and natural appearance. Younger patients or those who have never experienced significant weight fluctuations tend to have more elastic skin and are good candidates for larger volume fat extraction.
If skin elasticity is poor, taking away too much can leave loose, hanging skin that can potentially look worse than before. This is typical in seniors or individuals who have experienced significant weight loss. The loose skin risk is real, so surgeons have to check skin quality at your first visit.
Patients with poor elasticity might be steered toward skin-tightening procedures or smaller fat reductions to mitigate trouble.
Medical History
A patient’s medical history is important for each stage of liposuction. Factors like heart disease, diabetes, or clotting disorders can restrict the amount of fat that can be safely removed. Even previous surgeries or allergies might modify the plan.
Be 100% honest about medicines and conditions. Missing details can be dangerous during surgery.
Physician variables: Doctors usually err on the side of caution for patients with complicated histories. They might suggest staged procedures or more conservative fat removal to err on the safe side. A standard pre-operative health check with lab work and medications is typical for any surgery.
Surgical Risk
Extracting high volumes of fat has its own risks, including fluid shifts, hypotension, or fat embolism. If too much fat is removed, the body can go off balance of salts and fluids, causing shock. There’s the possibility of deep vein clots or breathing problems, particularly during lengthy operations.
To stay in the safe zone, surgeons closely monitor heart rate, blood pressure, and urine output during the procedure. Experienced surgeons understand how to respond rapidly if anything shifts.
Selecting a skilled team and a qualified center reduces the risk of complications and enhances the healing process.
Volume and Risk
Volume and risk Knowing how many liters you can rip out during liposuction is a matter of both volume itself and the body’s response to fluid shifts. The most popular measure for large volume liposuction is either total fat removed, which is about four liters, or total volume removed, which includes fat and solution, usually five liters.
Five liters is the generally recognized maximum allowable amount to extract at one sitting. This number isn’t hard and fast; patient size, health, and goals all factor in. Greater removals can translate to more swelling, larger fluid shifts, extended recovery periods, and additional aftercare.
Even minor losses, such as two liters off the abdominal region, can yield major aesthetic differences. Complications are higher in those with higher BMI or when more fat is removed. Meticulous planning and monitoring during surgery are essential to maintaining fluid balance.
Fluid Shifts
Liposuction sucks fat and it redistributes body fluids as well. Extracting liters of fat and fluid can throw off the internal equilibrium. This can cause the blood volume to decrease, potentially reducing blood pressure and pulse.
For instance, high volume liposuction can reduce systolic blood pressure and pulse rate for a few months post-operatively. The danger of hypovolemia—too little fluid in the body—mounts as more is removed. This makes it crucial to monitor fluids in and out the entire time.
Surgeons inject special fluids to keep patients hydrated, but have to be careful not to over- or under-fill. Swelling can run a prolonged course and more follow-up is often required, particularly after large volume removals.
Anesthesia Time
Long operations lead to more anesthesia, which increases risk. Big-volume liposuction often takes longer, pushing the body harder under sedation. The more time you spend under, the more opportunity there is for complications like blood clots, pneumonia, or heart strain.
Surgeons attempt to operate quickly to minimize anesthesia time. Patients should inquire with their physician regarding the type and duration of anesthesia to anticipate and how this could potentially influence their personal risk.
Embolism Dangers
Fat embolism is an uncommon yet dangerous risk. If too much fat is extracted, pieces can enter the bloodstream, clogging small vessels. The risk of embolism increases with a higher number of liters removed.
Good surgical skill reduces this risk, ensuring fat remains where it belongs. Indicators such as difficulty breathing or post-surgical confusion require immediate medical attention.
Aspirate Composition
What flows out is not just fat. The soup—dubbed aspirate—includes water, blood, and connective tissue. This mix results in the real fat loss being shy of the total liquid consumed.
For instance, taking five liters of aspirate could translate to just three liters of fat lost. Patients should inquire about what’s being eliminated so they can anticipate and interpret their results.
Beyond Pure Fat
Lipo does more than just extract fat. The procedure sucks out water and occasionally tiny chunks of other tissues. Knowing what is extracted during liposuction helps patients feel more informed about how to anticipate the results and recovery. The mixture of fat, fluids, and tissue called aspirate in the material suctioned from the body influences post-surgery appearance and influences the healing process.
Understanding this blend is critical to anyone considering fat transfer down the line. Surgeons need to make sure patients know what is removed so expectations remain realistic.
Aspirate Composition
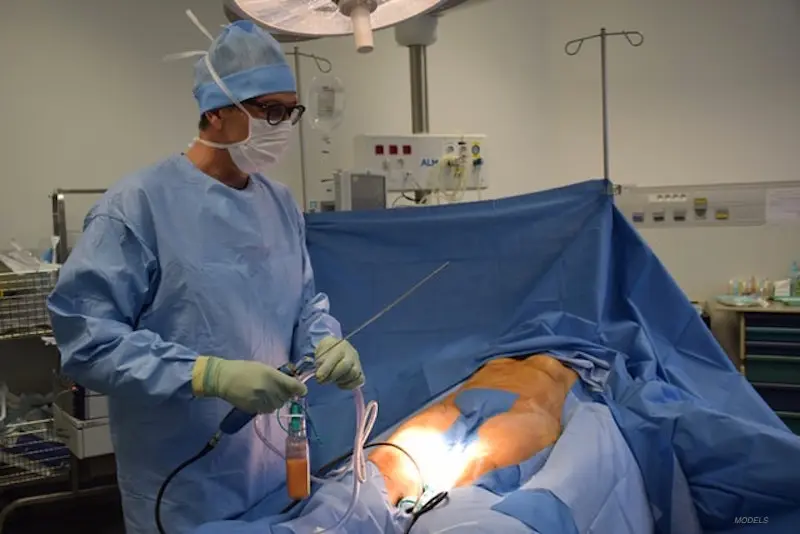
The combination of substance extracted during liposuction is known as the aspirate. It contains fat, blood, tumescent fluid, and occasionally small bits of tissue. Tumescent fluid is injected to numb the area and shrink blood vessels for less bleeding and bruising. Good fluid management is vital to patient safety.
If too much fluid is taken out or if levels are imbalanced, problems such as dehydration or fluid overload can occur. For instance, surgeons carefully monitor intake and output to establish limits. Methods to control this equilibrium may involve precise tracking of all fluids, application of compression clothing, and minimizing bleeding.
The OR team collaborates and tracks the patient’s fluid status in real time. This collaboration keeps the risk of complications minimal and aids in easier recuperation. Fluid management impacts the speed and comfort with which a patient heals. When the correct tissue fluid remains, swelling and bruising subside more quickly.
Safe and steady fluid balance is associated with better outcomes in the bulk of the population.
Fluid Management
True fat volume refers to the volume of fat actually removed, excluding the fluid. This figure matters in surgical planning and patient expectation management. For example, 10 to 12 pounds of fat and fluid is a lot, but if you want a small change, three to four pounds will do.
In places like Florida, local laws restrict fat removal to approximately four liters, which is equivalent to eight to nine pounds. Fat density varies for individuals, so the same quantity can appear different. Some will experience a significant transformation after eliminating just a couple of liters, while others require more to achieve similar results.
This knowledge helps patients discuss what is achievable with their doctor. Clear pre-op discussions communicate to all involved what is and isn’t possible.
True Fat Volume
The surgeon’s artistry and experience determine what can be done safely. Everyone’s health, body type, and objectives are important. Surgeons measure all of these things before and during surgery to establish safe limits.
Beyond pure fat, they all recommend that six to eight pounds or three to four liters is a safe maximum in one sitting. If more is required, it is best to divide it into two or more appointments, months apart. Patients can contribute by being inquisitive, voicing their aspirations and worries.
Such open discussions assist the team to collaborate and keep hazards minimal. Relying on your surgeon’s decisions is important, as they implement safety measures for optimal results. Liposuction is popular because it is low-risk, heals fast, and can focus on hard-to-shift spots that remain the same despite diet or exercise.
Surgeon’s Discretion
A safe and successful liposuction needs a thorough preoperative assessment. Surgeons use this step to set safe fat removal limits and spot unique risks that each patient brings. This helps make a custom plan for each person, not just a “one-size-fits-all” approach.
A detailed evaluation checks overall health, body fat distribution, and any medical issues that could raise the risk of problems. Surgeons talk to patients about their goals, lifestyle, and expectations. This helps the patient and surgeon understand what is possible and safe.
Patients play an active part by sharing their full health history and asking questions. Their input shapes the plan and helps keep the surgery safe and satisfying.
Preoperative Assessment
Surgeon’s discretion is needed for liposuction. Even with a good plan, things can change in the OR. Surgeons observe for indicators such as blood loss, tissue reaction, and patient stability.
If the body doesn’t react as they hoped, they can decrease the amount of fat extracted right then and there. This thinking in the moment can prevent problems before they begin. A surgeon’s discretion helps here.
Expert surgeons notice warning signs immediately and adjust quickly. That way, the patient stays safe and the result is better. Not all surgeons are created equal, so it’s smart to select someone who has been performing liposuction for years.
Just trust your surgeon’s discretion. If a surgeon says it is safer to quit at a lower volume, that’s grounded in careful observation, not guesswork.
Intraoperative Judgment
For some individuals, it’s not safe to take a massive amount of fat at once. That’s what staged procedures are for. Instead of being all at once, surgeons divide the treatment into two or more sessions.
This technique reduces hazards such as excessive blood loss or bodily stress. A staged approach facilitates healing. Because patients can recuperate between sessions, it places less strain on the heart and other organs.
It allows the body to acclimate to its new contours and volume. In the long run, the end result tends to be more organic and proportionate. For those with high-volume fat blasting ambitions, consider this your answer.
Although it might take more time, it is safer and has better outcomes.
Staged Procedures
It is important to establish realistic expectations. Safe liposuctioned fat limits are around 3 to 5 liters per session. Being aware of this can help keep expectations grounded.
Some patients anticipate drastic changes after one treatment, but it isn’t necessarily safe or feasible. Knowing what the surgery can and cannot accomplish results in more satisfaction at the conclusion.
Patients who reset their stance are happier with their outcomes. It is crucial to align objectives with what is beneficial and feasible. The care team support throughout recovery is what matters.
Our surgeons and nurses answer questions, share tips, and help soothe concerns, so the journey is easier for all involved.
Realistic Expectations
Liposuction is a body contouring procedure — not a weight-loss solution. They always want to know the answer to how much fat can safely be removed in one sitting. It’s a good question with many variables, but a solid range is generally 2 to 5 liters. Surgeons have removed as much as 6 or 7 liters in special cases, but this is uncommon. Most clinics and medical boards impose limits to decrease the likelihood of complications associated with removing excessive fat at one time.
What counts is safety. Removing additional fat isn’t necessarily the ideal solution. High-volume liposuction, which involves more than 5 liters, may cause additional swelling, blood loss, and prolong the healing process. Doctors monitor for shifts in fluid and blood loss during surgery. These dangers imply that most surgeons schedule smaller, safer excisions.
Generally, doctors take less if the individual is older, has medical issues, or if multiple areas are treated concurrently. Surgeons make decisions according to each individual’s health, body type and objectives. A fit, young individual may be able to tolerate more, but a frail or scarred person or someone with a lighter body mass might require less.
For example, a patient with a BMI of 30 may have 4 liters removed and a very thin patient may only have 2 liters. The location treated counts as well—hips and thighs can store more fat, while arms or chin require smaller removals to effect a change. Outcomes ought to be consistent with physique and skin texture.
If you take off too much fat, skin won’t shrink back which causes sagging or ripples. Good skintone folks get silkier results with higher volumes. A slow approach with more than one session if necessary can sometimes deliver a safer, more balanced change.
Liposuction is frequently combined with other adjustments, like eating better or moving more, to achieve long-term results. It’s true that the fat you remove doesn’t return, but if you go back to your old habits, new fat can accumulate. Some good planning, honest goals, and a clear talk with a trusted doctor are the secret to safe and pleasing outcomes.
Conclusion
Liposuction isn’t just sucking fat out. Surgeons examine health, anatomy and safety guidelines. The majority have fat removed in the 2 to 5 liter range. Doctors monitor closely to reduce risk. Some countries have a hard cap for how much fat can leave. Every person’s results look different. A safe plan requires a trusted, skilled physician and candid discussion of goals. Ready for real transformation? Inquire, verify, and be forthright with your surgeon. Curious to know more? Talk with a licensed provider to get answers that fit your own case. You and your peace of mind come first.
Frequently Asked Questions
How many liters of fat can be safely removed with liposuction?
Most surgeons will remove up to five liters of fat. This limit assists in reducing the risk of complications and promotes safer recovery.
Does the safe amount of fat removal vary per patient?
Yes, the safe quantity varies based on personal elements, including your general health, body type, and medical background. Your surgeon will evaluate these prior to suggesting a volume.
Why is there a limit on liters removed during liposuction?
Limits are in place to preserve patient safety. Taking too many liters is riskier and results in dehydration, blood loss, and anesthetic complications.
Does liposuction remove only pure fat?
No, liposuction removes fat interspersed with fluids and blood and sometimes a few tissue fragments. Not all of that is fat that was removed.
Can a surgeon remove more than 5 liters if needed?
Some surgeons may extract more, but only with careful medical oversight. Anything over this amount increases health risk and is not typically advised.
What should patients expect in terms of results from liposuction?
Disclaimer: Results vary by individual. Liposuction can enhance body contour, but it isn’t a means for losing weight. Realistic expectations are key to happiness.
How do surgeons decide the right amount to remove?
Surgeons follow medical guidelines, taking into consideration patient health and cosmetic goals. Their focus is safety and a natural look for every patient.